Le Strum
LeStrum


The bridges were glued in:

I was inspired by one of the builds on the LeStrum website where screws had been used to attach the strings. In they went:

I thought I would solder wires to these to plug into the headers I'd already soldered to the Le Strum. It appears there is some coating on the screws that makes this very difficult. Of course, I didn't know this at the time...


Bit of a mess in there, but I did measure everything.


...and the laser cutter with some 3mm black glossy acrylic:

While I was at it, I cut out the round button caps from some spare 9mm plywood using the acrylic illustrator file as a guide.


When I placed the scratch plate on the body, I wasn't happy with the look. Don't like that square power button either. Time to get the file and some sandpaper out...

Much better!


Will this ever end????

Quite a few nicked and bleeding fingers after that.


And we're done. Phew. 6 months on and off but I'm happy with it. It makes my Streichfett sound even more amazing!

I bought and built Jason Hotchkiss's fantastic Le Strum kit from tindie.com and had great fun with it, but the small buttons hurt my fingers. There were quite a few inspiring and creative mods on the six four pixels website, so I thought I'd have a bash and see if I could make something for myself to make playing it easier. Here's what I eventually ended up with:


I didn't have a concrete plan to start with and the whole process was organic. I learned A LOT! I'd never attempted anything like this before but you learn through doing and making mistakes, and I made a lot. It didn't help that I kept changing my mind about the design on an almost daily basis...
Here's a video of it being played:
Get the design right


I went with a rounded teardrop shape – it should be easy to hold and play with both the left and right hand. I printed off the strings and button arrangement to get a rough position for them on the body of the instrument.


I didn't have a clear idea about how the buttons should work so I tried a few things out. This is one of the rejected experiments – laser cut acrylic with spirals for buttons. The spiral would act as a spring and press down on a button just under the surface. The plastic I used here was too brittle and a few of the spirals broke off. It did work, although I wasn't happy with the look.


It's starting to look like an instrument now.

I had initially thought of creating a guitar-like body for my Le Strum. I mocked-up some visuals in Illustrator and printed them out full-size to see if they were ergonomic. This is an early version.

I tried out some ideas for graphics for the buttons. both these ideas I eventually rejected.

Chord Buttons
Next up the chord buttons. Fritzing helped here. My electronics skills are really basic - it's amazing I managed to build the Le Strum kit at all...


Probably not the best way to do this...


At this point I hadn't thought about the mechanics of the buttons. Time to experiment...


The Main Body
I produced my rough shape in Cinema 4D – really just to get an idea of what the final thing would look like. I haven't included a render here as it wasn't very good.
My woodworking skills are zero. I had thought that I could chisel away at a block of wood and the instrument would reveal itself to me. I hadn't factored in my lack of skill at all.
I had access to a laser cutter, so I figured I could make the body in slices and just glue it all together.
I needed to check the string spacing would work first. I created a mock up of the stringboard and lasercut it out of some plywood. After some assembly I realised the strings were too close together and would touch and short in certain places. One more prototype and all was working correctly:


A few hours in Illustrator later...

I bought 9mm thick plywood and worked out the dimensions – how much space I'd need inside to contain all the electronics. I cut holes for the chord buttons based on little rectangular plastic button caps I had lying around. There is also a battery cover on the bottom to allow easy changing, although I've has the same 9v battery in my LeStum for 2 years now and it's still working fine.
After a couple of hours at the laser cutter:

Glue it all together:


A quick trip to a woodworking shop to borrow their sander:
I had to apply a lot of elbow grease (and progressively finer grade sandpaper) to smooth it all off. After that, stain and varnish:
The bridges were glued in:
I was inspired by one of the builds on the LeStrum website where screws had been used to attach the strings. In they went:
Time to insert the electronics...
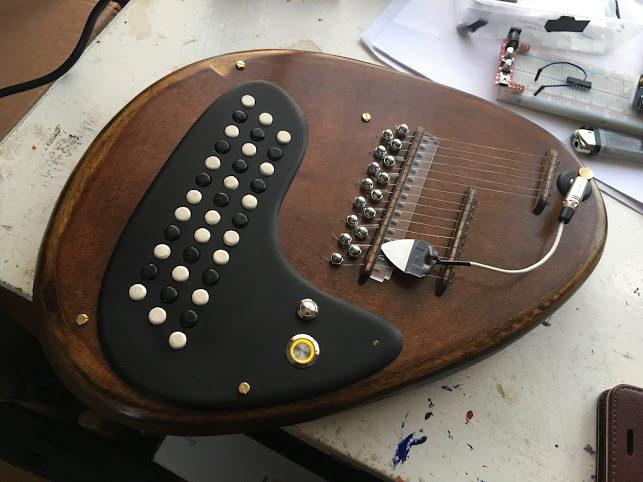
I had finally come up with a solution for my chord buttons using the waste from the body top laser cut:
I make the chord button round and glue a scratch plate over the top to keep them all in place. Back into Illustrator:
...and the laser cutter with some 3mm black glossy acrylic:
When I placed the scratch plate on the body, I wasn't happy with the look. Don't like that square power button either. Time to get the file and some sandpaper out...


Much better!
I also cut, filed and sanded an acrylic cover for the stylus socket.
Still not done with the buttons though. They needed hand sanded to round them off, then spray painted - black and ivory:
Will this ever end????
String-up time:
Quite a few nicked and bleeding fingers after that.
New buttons in – I got rid of the horrible plasticky square button:
The Stylus plugged in:
Saying that, if I did it again, I'd create a proper PCB for the buttons and re-think the strings. I've already bought another LeStrum board and IC so I may have another go when I have the time.
Paul Riddell 2020
Comments
Post a Comment